Tuesday 25 August 2020

Create an anchor or bookmark in a Blogger post

Individual words or headings in Blogger can now have bookmarks or anchors within a post. Use this feature for long posts to direct a reader to a particular section of a post, to provide an internal link within the page.

Highlight the word or phrase then select Create/edit anchor
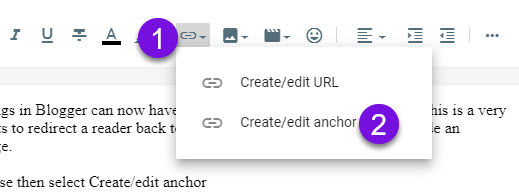
Create anchor

Name the anchor in the dialogue box. You may wish to name it the same as the word/s you have highlighted.

The second step involves creating the link back to the anchor. This link will be 
the URL of your post ending with #name-of-the-anchor. 

These anchor links, or as I referred to them - bookmarks, are only active once a post is published. Use the link below to return to the top of this post. The link for the text Back to top 
https://www.carmelgalvin.info/2020/08/create-anchor-or-bookmark-in-blogger.html/#top because I named the anchor text Top of post #top

This post first appeared on https://carmelgalvin.info

Monday 3 August 2020

Blogger interface upgrade

Changes afoot

Blogger changes augur well for the future. Along with Google sites which were upgraded several years ago to provide a simpler interface, Google has now committed to improving Blogger. Many alterations have been made to the early beta version with user feedback critical to improvements.

For those still uncertain about moving to the new interface here are a few screen shots to reveal where previous functions are now located.

Editing a blog post

The toolbar has been redesigned with several additions. 
  • The HTML view is found under the first icon, the pencil, it also includes undo options
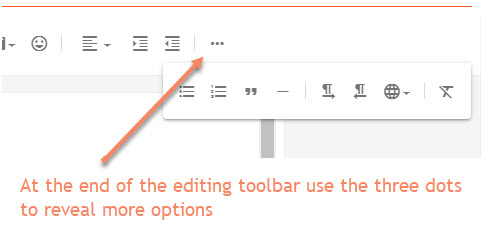
  • New under the Link icon is the ability to create a bookmark on the page.
  • Photos can now be added from one's Google photos as well as those previously used on Blogger
  • A wide range of input language options are under the globe icon, along with left to right and right to left input options

editing toolbar
Editing toolbar

The Save button is now located under the Preview drop down.

Editing Pictures

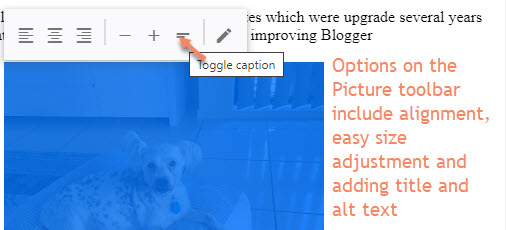
Blogger is not a picture editing tool so it is a good idea to have edited your pictures before they are added to your blog. Once a picture is inserted, highlight the picture to reveal the picture toolbar which provides easy alignment, resize options, caption, title and alt text options.

Picture toolbar options

Adding labels

The post settings are unchanged on the left of the edit screen. 

Customising the Theme

Do you prefer to choose the font and colours along with many other elements to personalise your blog? Choose Theme from the sidebar, then Customise to see the wide range of options available.

This blog is based on the Simple theme, most customisation options are still available in a sidebar menu. This screenshot from another blog shows the customise button from the Notable theme. This will take the blog owner to the Theme Designer options.


Notice also the New Post button which has been moved back to the top of the page following user feedback given to Google.


Scroll under each option to reveal a wealth of ways in which you can personalise your Blogger theme.
If you make changes to any element of the theme, the disk icon to save those changes is located in the bottom right hand corner of the screen.

If  you have any questions about the new Blogger interface, add them in the comments where I will respond to queries. Do look and try the new interface before the permanent changeover occurs.

Other input options

Now we need a decent iOS app for Blogger - how about it Google? The Blogger app for Android has basic options and was updated in June 2020. The best iOS app I have used is BlogTouch. 

If you write your posts in Word or some other text based program, paste as plain text or be sure to  remove the formatting for quicker loading pages. Use Blogger's headings and subheadings for a consistent look across all posts.

This post first appeared on https://carmelgalvin.info

Enjoyed this post? Want to see more?