Monday 16 November 2020

Mission Creep in Family History

FHF Really Useful family history Show
Logo on FHF Really Useful Family History Show


Mission Creep : a gradual shift in objectives, when one sets out on a certain research path and gets  taken down another path into side issues.

I learnt this definition this weekend while watching the presentation by Helen Tovey of Family Tree magazine as part of the FHF Really Useful Family History online conference. 
"While on a mission to find out one thing, it's all too easy to get side-tracked when tracing our family histories. Helen Tovey takes a look at how to make a 10 minute task take 10 hours, and learns some salutary lessons along the way."
Helen outlined her research question and then showed the many paths taken as her research expanded to cover social circumstances well beyond her original enquiry. This was a delightful presentation with reflection along the way phrased as “What have I learnt?” 

Time to pause and reflect of what have I learnt from this conference. 
  1. This was just one of the many excellent value learning opportunities provided online for family historians. For just 7 pounds (about $12.70 Australian) 21 talks were provided, all available across 48 hours. I watched 10 of those talks, the ones that interested me most, so for less than $2 per talk I had access to experts in a variety of fields in English and Scottish research. One should choose wisely how to spend online time. I would not have attended 21 talks in a one day, or even a two day conference, so do not expect myself to attend every talk in the online environment. [edited; 24 hours later now and I see 23 videos available]
  2. Once again I was reminded of the importance of recording every detail from available records to save wasting time by having to revisit searches, no matter how trivial the information may appear at the time.
  3. The FamilySearch wiki is always worth a revisit as a wealth of information is continually added there. The England Genealogy page provides an excellent list of all the likely sources and record types one needs to exploit when investigating family history. Navigating the wiki is simplified by the use of a similar boxed layout on all pages with multiple access points provided throughout.
  4. It is always worth learning new skills and attending presentations from experts in fields other than one's own interest to look afresh at different ways of doing things. The Trade and Occupation Sources presented by David Cufley and the My Ancestor was an Agricultural Labourer by Ian Waller both provided a wealth of sources along with useful background information about terminology and occupations in the UK.
  5. A comprehensive coverage of a variety of ways to search the three Free UK Genealogy sites, Free BMD, FreeCen and FreeReg was concise and clearly presented by Graham Hart with an important reminder to always check the coverage of any database one may be searching.
  6. Not all organisations have yet managed to provide a seamless online experience by providing videos, chat and links to speakers' notes in a single platform. The push to sign up for yet another platform was less than optimal with a flurry of underlined words in emails that were not links. However I am thankful to the Family History Federation for providing the opportunity to attend this conference from Australia, an opportunity I would not have had, had the conference not been online. 
To return to Mission Creep, that gradual shift in objectives. I started researching family history in 2013 with the objective of finding and recording the stories of direct ancestors. Over time this has expanded to distant relatives on both sides of our families. Whilst the hunt for sources is half the joy of family history for those of us who enjoy the research process, it is the recording of those ancestors stories that should be my focus. 

Time to move back to that objective, know that many sources are out there, but stories need to be told to be preserved for future generations.

Thursday 12 November 2020

Converting images to text

Three ways to go

My favourite app for converting an image with text into editable text has been Google Keep for the last few years. I explained how to use it in this post.
I also regularly use Google Docs, this involves uploading an image to Google Drive then choosing to open it with Google Docs. This works for PDFs too.

My latest favourite is the Microsoft Office app available for both Android and iOS (not available for versions older than iOS 13)

The Office app can be used without a Microsoft account but best value is its use with an account.
On opening the app choose Actions to reveal the following screens.

The Image to Text action provides a useful option for pages of text, whether they be from a book, a PDF or on screen on your computer. It is very simple to use, allow the app to use the camera, take the shot, pull in the corners to the section of the image to be converted and confirm. 

paragraph from Writing Interesting Family Histories by Carol Baxter


The text appears below the picture and can be copied to other apps or shared.
The image to Table option is equally effective in converting table data to Excel. 

PDF options

Scroll down on the Actions screen to see the additional PDF options


Have you tried this Office app? A useful overview is provided by Leila Gharani in this short YouTube video.

This post first appeared on https://carmelgalvin.info

Wednesday 28 October 2020

ANZAncestryTime Cemeteries and Graphics


ANZAncestryTime is a Twitter chat each Tuesday evening see details here.
In week 3 we discussed cemeteries and I proposed a geneameme for bloggers.
So far three bloggers have posted responses.
Please visit these blogs to read the posts
Fran Kitto on TravelGenee
Jill Ball on GeniAus 
and mine is at Earlier Years
If your post is still in the writing or I have missed seeing it, please add to the comments below and I will list it here.
Made in Canva

This week I commented on using graphics in blog posts. If I do not have an appropriate photo to add to a post I use a variety of apps to generate an image.

Canva is a well known tool and has free and paid versions. It is available on the web and on both iOS and Android devices. The free version allows plenty of scope, a wide variety of templates for various platforms as well as the ability to set one's own dimensions. 

Looking back through my designs, all of which the free account retains, I see I have been using Canva at least since January 2014. The tiled graphics for the local group's website were all designed in Canva and I can easily update any design as needed. One's own photos can be uploaded and used in a graphic as above and the downloads are high quality pngs.

Made in Photofunia

PhotoFunia is another place for quick effects. This can be used without the need for an account. If you choose Halloween you will see the cemetery gates, all I needed to do was type in the text then download the resulting picture. Enjoy exploring the Vintage and Books sections. An app is also available for iOS and Android devices.

Made in PhotoMapo on iPad

Made in PhotoMapo then vintage effect applied in Pixlr

Photo Mapo is an iOS app which gives geographic context to your photos with a variety of templates to add explanatory text.

Another favourite I use regularly is WordSwag which is another free app for both iOS and Android. 
Lots of backgrounds and text varieties in WordSwag


Made in WordSnag with one of my photos on iPad


Made in WordSnag with a screen clipping behind text
Have fun trying a new option for your blog images.


This post first appeared on https://carmelgalvin.info

Wednesday 21 October 2020

Concerning Cemeteries - a Geneameme


At the conclusion of a Twitter chat on #ANZAncestryTime my head was buzzing with memories of cemeteries, monuments, tombstones and graveyard visits and tales. What an opportunity this provides for a genea-meme!

As family historians and genealogists many of us have visited a wide range of cemeteries in the pursuit of ancestors' graves. At other times we have attended funerals and memorial services. All of these experiences are worth recording.

If you would like to participate, below are some suggested headings for a blog post. Please feel free to add your own or modify/omit to suit your purpose. In order to refrain from the maudlin, I've started with the beautifully tended cemetery and suggest ending with a humorous tale. There were a few humorous incidents recalled on the Twitter chat but this one from Sharn provided much amusement.
I look forward to reading a great variety of experiences and viewing the accompanying photos. Please add a link to your blog post in the comments below and I will list them all in a blogpost.
  1. A beautifully tended plot or cemetery
  2. Overawed by the size 
  3. Coldest (temperature wise!)/ hottest
  4. Smallest - most intimate
  5. Largest - tombstone or graveyard
  6. Most memorable, monumental or unforgettable
  7. Oldest grave found or oldest established cemetery visited
  8. Tribute memorial/building/experience
  9. Simple marker 
  10. The unexpected
  11. Best find ever
  12. Locals lived here
  13. At the crematorium
  14. Closest relatives are buried here e.g. parents, sibling/s
  15. Most humorous incident
Herein lies Ben Bowery
Left his girls without a dowry

This post first appeared on https://carmelgalvin.info

Tuesday 25 August 2020

Create an anchor or bookmark in a Blogger post

Individual words or headings in Blogger can now have bookmarks or anchors within a post. Use this feature for long posts to direct a reader to a particular section of a post, to provide an internal link within the page.

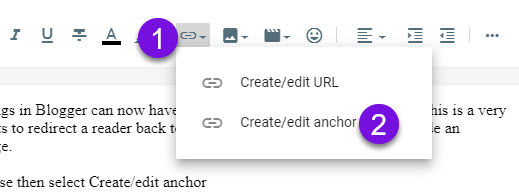
Highlight the word or phrase then select Create/edit anchor

Create anchor

Name the anchor in the dialogue box. You may wish to name it the same as the word/s you have highlighted.

The second step involves creating the link back to the anchor. This link will be 
the URL of your post ending with #name-of-the-anchor. 

These anchor links, or as I referred to them - bookmarks, are only active once a post is published. Use the link below to return to the top of this post. The link for the text Back to top 
https://www.carmelgalvin.info/2020/08/create-anchor-or-bookmark-in-blogger.html/#top because I named the anchor text Top of post #top


This post first appeared on https://carmelgalvin.info

Monday 3 August 2020

Blogger interface upgrade

Changes afoot

Blogger changes augur well for the future. Along with Google sites which were upgraded several years ago to provide a simpler interface, Google has now committed to improving Blogger. Many alterations have been made to the early beta version with user feedback critical to improvements.

For those still uncertain about moving to the new interface here are a few screen shots to reveal where previous functions are now located.

Editing a blog post

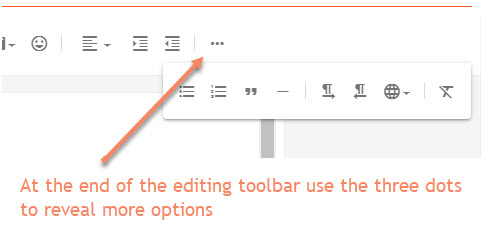
The toolbar has been redesigned with several additions. 
  • The HTML view is found under the first icon, the pencil, it also includes undo options
  • New under the Link icon is the ability to create a bookmark on the page.
  • Photos can now be added from one's Google photos as well as those previously used on Blogger
  • A wide range of input language options are under the globe icon, along with left to right and right to left input options

editing toolbar
Editing toolbar

The Save button is now located under the Preview drop down.

Editing Pictures

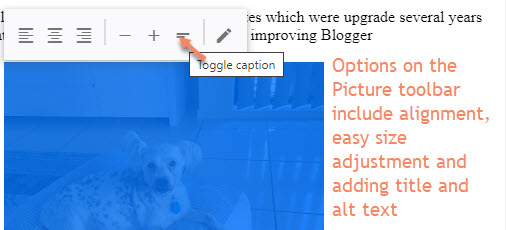
Blogger is not a picture editing tool so it is a good idea to have edited your pictures before they are added to your blog. Once a picture is inserted, highlight the picture to reveal the picture toolbar which provides easy alignment, resize options, caption, title and alt text options.

Picture toolbar options

Adding labels

The post settings are unchanged on the left of the edit screen. 

Customising the Theme

Do you prefer to choose the font and colours along with many other elements to personalise your blog? Choose Theme from the sidebar, then Customise to see the wide range of options available.

This blog is based on the Simple theme, most customisation options are still available in a sidebar menu. This screenshot from another blog shows the customise button from the Notable theme. This will take the blog owner to the Theme Designer options.


Notice also the New Post button which has been moved back to the top of the page following user feedback given to Google.


Scroll under each option to reveal a wealth of ways in which you can personalise your Blogger theme.
If you make changes to any element of the theme, the disk icon to save those changes is located in the bottom right hand corner of the screen.

If  you have any questions about the new Blogger interface, add them in the comments where I will respond to queries. Do look and try the new interface before the permanent changeover occurs.

Other input options

Now we need a decent iOS app for Blogger - how about it Google? The Blogger app for Android has basic options and was updated in June 2020. The best iOS app I have used is BlogTouch. 

If you write your posts in Word or some other text based program, paste as plain text or be sure to  remove the formatting for quicker loading pages. Use Blogger's headings and subheadings for a consistent look across all posts.

This post first appeared on https://carmelgalvin.info

Tuesday 23 June 2020

Changes to Trove Lists

The good, the bad and the ugly

Trove

Trove is one of my favourite sites for finding items related to my family history and for providing background to the life and times of these ancestors. It has a wonderful range of resources provided by the National Library of Australia in conjunction with a wide range of partners throughout Australia. This post from 2010 from the National Library of Australia provides some background to the early days of Trove. The site news page detailed developments from May 2009 until August 2016.

Since then, Trove has kept its users up to date with webinars and videos as new features were added. In 2019 I was pleased to contribute to surveys of Trove users about proposed changes to website structure and colours and in February 2020 we were given a glimpse of what was to be launched in June with the opportunity to provide some feedback.

The preview is now live for 4 days before the launch on June 26th. My comments in this post reflect my experience of the new interface from the point of view of a family historian with a teaching and librarianship background.

Interface

A new clean look is pleasing but with so much white space endless scrolling is needed on the screens I use.  I work on a 15" laptop and an iPad.

Text correction

Once the orange banner disappears from the new interface, text correction on the iPad will be easier. In the existing version of Trove editing text on a mobile device was very difficult.

Text correction on the laptop now has a very small window, starting more than half way down the full screen. The large green Edit text and the big black arrows take up a lot of space before one gets to the actual text. A thick black bar across the bottom limits this window space even further. At the most one can only see 7 or 8 lines of text.

The font is clear but one needs to scroll to get to the Download or Print buttons as the side bar icons start well down the page.

Lists

I have 43 saved lists in Trove, some public and some private. Some of my lists have over 300 items and the smallest list has only 2 items.  When I add a new item to a list I generally move it into date order within that list and add a note as to why I have saved it or copy in the text of the article or notice. 

Existing version of Lists
  1. All items in a list are displayed on one page. 
  2. Items are re-ordered by renumbering the item or using the arrows to move items up or down the page.
  3. Any item in the list can be searched for by date, name or any other criteria by using Find on page (CTRL-F) in the web browser. I use this frequently to locate previously saved items within long lists when I want to get an image of the item.
New version of Lists
  • Items in a list are spread over several pages with only 20 items per page.
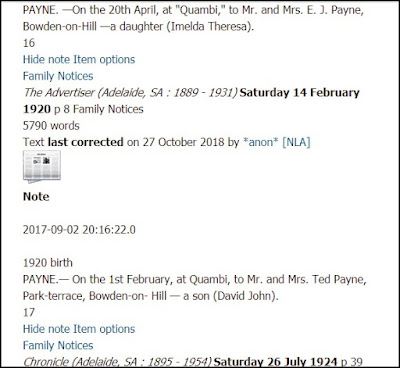
    -- Only the items on a single page of a list can now be searched for within the list e.g. if I wished to find an article I had saved with the birth of a child in Quambi I would need to know on which page of the list that article appeared.
  • Items are reordered by renumbering the item or using the cross hairs to drag to another position.  -- Given that the list is now spread over several pages it is not possible to use the cross hairs to alter position across the pages.
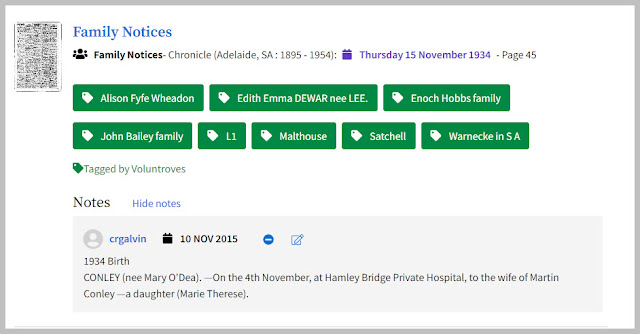
  • Space taken up by a single item that has many tags
  • Thick green tags dominate items in a list where users have added many tags, they take up a lot of space further lengthening a list.
  • Lists can now be filtered by type of information e.g. family notice, article etc. Items can be found within lists by date range - very useful. *****
  • A new feature in lists is the ability to export a list. I was keen to try this but very disappointed to note that the csv of the exported list only contained a link to a thumbnail of the page not to the article itself. Removing the t at the end of the link in the csv only provided a slightly larger view of the page but does not provide a way into the page or article. The positive aspect of the csv is that it contained the notes I had made about each item.
  • Another new feature is collaborative lists. This will be useful for family historians who are researching the same families or locations.
No doubt I will grow accustomed to some of the new ways of looking at things and hope that some drawbacks in the new interface will be improved over time. In the meantime I advise those who rely on searching their lists in Trove to act quickly before June 26th.

How I have preserved my ability to search within my Trove lists -a workaround

*** Evernote to the rescue! ***

Today I have visited each of  my 43 lists in the existing version of Trove and saved each list to Evernote.
In a web browser - Use the Evernote clipper and choose either Article or Simplified Article, choose the notebook and add any tags and remarks then Save clip.
On iPad Use the share option in the browser to Send to Evernote,  If you want the simplified view, this can be applied to the list from within the Evernote app.

Each list becomes a separate note but all the items in that list are preserved on one page.
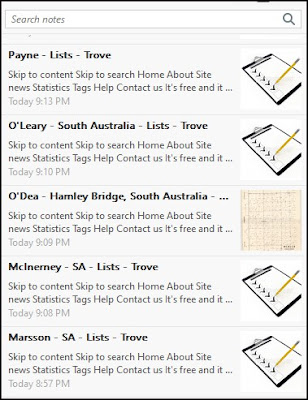
A view of some of my Trove lists in Evernote

Within each note the items appear just as they appeared in Trove - see below. The note has a direct link to the list in Trove and each item within the list also retains its own individual link to the exact article saved. 
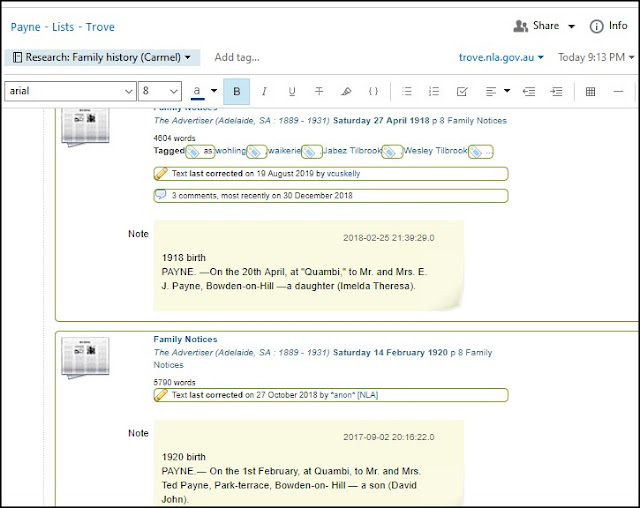
The Payne list - a single note in Evernote shows the individual items


View of the same 2 items in a simplified list

This is just a work around so that I can search within any individual list. It also has the added advantage of the powerful Evernote search. 
Evernote indexes every word within these notes so now a search for Quambi it will show me all instances of that word across all of my lists. This is very useful for a family historian.

If this would work for you, be quick, you will need to do this before the changeover to the new Trove on June 26th. I tried to send my lists to Evernote from the new version of Trove but only received error messages. Any private lists need to be made public to send to Evernote. Once my private lists were in Evernote I reset them to private in Trove.

I will continue to utilise lists in Trove but do hope that the export to csv function is improved to provide active links to individual articles. I would also like to see the ability for the user to decided how many items in a list display on a page so that once again we would be able to search within our lists.

What features of the new Trove interface please you?

This post first appeared on https://carmelgalvin.info


Monday 13 January 2020

Click on the Cat

Search the catalogue


This post describes the migration of an Access database to LibraryThing to make resources easy to search via the web platform TinyCat. I have written previously “Once upon a shelf” about the usefulness of this system for small libraries or personal collections.

TinyCat by LibraryThing provides an inexpensive web platform for small libraries. My local genealogical society has an Access database of resources. While this is useful, it is not web accessible and library solutions of web hosted databases are beyond the financial reach of our small volunteer organisation. To this end I have been uploading  our resources to LibraryThing to make them easy to search. LibraryThing  has a universal import function that accepts a wide range of file formats.
The process involved several steps but is simple enough for anyone with basic computer skills.
  1. Export local records from Access (any database)  to Excel (any spreadsheet) – skip this step if your records are already in a spreadsheet!
  2. Download the sample csv from LibraryThing
  3. Delete any fields not needed in the sample csv – we did not need Rating, Review or Date read as none of those were part of our database.
  4. Reorder the data columns to match the sample csv columns
  5. Insert the header row from the sample csv – the 7 fields used  - 'TITLE' | 'AUTHOR (last, first)' | 'DATE' | 'ISBN' | 'PUBLICATION INFO' | 'TAGS' | 'CALL NUMBER'
  6. Save the file as a csv with a meaningful title –  I chose to upload limited sections of data  progressively e.g. 200 records at a time.
  7. Upload at Import records.  The upload scans the file for valid ISBNs then identifies those records that have no ISBNs and asks for confirmation on how to proceed. LibraryThing does accept titles without ISBNs.
  8. Choose the most relevant cataloguing sources for your data. I chose to have LibraryThing search for the records firstly at the National Library of Australia, then the State Library of Queensland and the British Library. There are hundreds of reliable sources to find the books and other resources.
By uploading only a small portion of records, the data was usually processed within half an hour. I then checked each upload to see if all records had been processed or if a few needed to be edited or added manually. LibraryThing adds Dewey numbers and Subject Headings so we used the Tags field for our local subjects. The tags data needs editing but that is easy to do in LibraryThing with bulk edit.

While the process of uploading all our data is not yet complete, our online catalogue is now available for anyone to search. Still to be added – local Queensland resources, Journals and maps. Most of our CDs have been migrated to our internal data library.

At TinyCat I then set up preferences for what data appears on the home page and the search pages. LibraryThing’s YouTube channel has plenty of short videos on how to set up TinyCat features for the intended audience.

Future plans – later in the year we may add patrons and use the built in loans function, but first we’ll finish adding and tidying up the data. Here's our work in progress.

Cooroy-Noosa Genealogical & Historical Group TinyCat – Profile on LibraryThing
How to search our catalogue – a short screencast guide

Some small Australian libraries using LibraryThing and TinyCat

The profile links for these libraries show the variety of ways in which data can be structured, by collections, tags and media. The first link in each line is the TinyCat platform.

Pros 

affordable, web interface
easy to add resources
Professional cataloguing data from hundreds of the world's libraries
built in circulation model
TinyCat features are adaptable to individual libraries - choose the fields you want displayed, edit the home page

Limitations

A minor one but may be important for your organisation - No data field for purchase price, we'll keep this data elsewhere.

If your volunteer organisation has less than 20 000 records,TinyCat by LibraryThing may provide you with a cheap but professional online catalogue. I have no affiliation with LibraryThing other than being a satisfied personal user since 2006.


  • This post first appeared on https://carmelgalvin.info

Enjoyed this post? Want to see more?