Showing posts with label blogs. Show all posts

Wednesday, 2 April 2025

Blogging in April A-Z 2025

Family History and Genealogy bloggers at Connections2025 Conference in Brisbane in March
Photo courtesy of Jill  Ball

Blogging in April 

Here is a list of Australian and NZ bloggers I have so far come across who are participating in the 2025 A-Z April Blogging challenge. The challenge is to post each day in April except Sundays using the alphabet as a guide.

Some are telling the stories of their families migration, some are focused on places or their experiences and objects. There is sure to be plenty here for your reading pleasure throughout April. 

Carole McCulloch - AI and genealogy 
Carmel Galvin - On this Day  yes, that's me.
Jennifer Jones - The Earl Grey Orphan Scheme 
Jill Ball - Peculiar Pics from her travels
Linda Curry - The Swinging Sixties 
Michelle Nichols - Pieces of my Family 
Sandra Williamson - Journeys of my Family 

If I have not found your blog, please let me know and I shall add you to this list.


This post first appeared on https://carmelgalvin.info

Wednesday, 28 October 2020

ANZAncestryTime Cemeteries and Graphics


ANZAncestryTime is a Twitter chat each Tuesday evening see details here.
In week 3 we discussed cemeteries and I proposed a geneameme for bloggers.
So far three bloggers have posted responses.
Please visit these blogs to read the posts
Fran Kitto on TravelGenee
Jill Ball on GeniAus 
and mine is at Earlier Years
If your post is still in the writing or I have missed seeing it, please add to the comments below and I will list it here.
Made in Canva

This week I commented on using graphics in blog posts. If I do not have an appropriate photo to add to a post I use a variety of apps to generate an image.

Canva is a well known tool and has free and paid versions. It is available on the web and on both iOS and Android devices. The free version allows plenty of scope, a wide variety of templates for various platforms as well as the ability to set one's own dimensions. 

Looking back through my designs, all of which the free account retains, I see I have been using Canva at least since January 2014. The tiled graphics for the local group's website were all designed in Canva and I can easily update any design as needed. One's own photos can be uploaded and used in a graphic as above and the downloads are high quality pngs.

Made in Photofunia

PhotoFunia is another place for quick effects. This can be used without the need for an account. If you choose Halloween you will see the cemetery gates, all I needed to do was type in the text then download the resulting picture. Enjoy exploring the Vintage and Books sections. An app is also available for iOS and Android devices.

Made in PhotoMapo on iPad

Made in PhotoMapo then vintage effect applied in Pixlr

Photo Mapo is an iOS app which gives geographic context to your photos with a variety of templates to add explanatory text.

Another favourite I use regularly is WordSwag which is another free app for both iOS and Android. 
Lots of backgrounds and text varieties in WordSwag


Made in WordSnag with one of my photos on iPad


Made in WordSnag with a screen clipping behind text
Have fun trying a new option for your blog images.


This post first appeared on https://carmelgalvin.info

Tuesday, 25 August 2020

Create an anchor or bookmark in a Blogger post

Individual words or headings in Blogger can now have bookmarks or anchors within a post. Use this feature for long posts to direct a reader to a particular section of a post, to provide an internal link within the page.

Highlight the word or phrase then select Create/edit anchor

Create anchor

Name the anchor in the dialogue box. You may wish to name it the same as the word/s you have highlighted.

The second step involves creating the link back to the anchor. This link will be 
the URL of your post ending with #name-of-the-anchor. 

These anchor links, or as I referred to them - bookmarks, are only active once a post is published. Use the link below to return to the top of this post. The link for the text Back to top 
https://www.carmelgalvin.info/2020/08/create-anchor-or-bookmark-in-blogger.html/#top because I named the anchor text Top of post #top


This post first appeared on https://carmelgalvin.info

Monday, 3 August 2020

Blogger interface upgrade

Changes afoot

Blogger changes augur well for the future. Along with Google sites which were upgraded several years ago to provide a simpler interface, Google has now committed to improving Blogger. Many alterations have been made to the early beta version with user feedback critical to improvements.

For those still uncertain about moving to the new interface here are a few screen shots to reveal where previous functions are now located.

Editing a blog post

The toolbar has been redesigned with several additions. 
  • The HTML view is found under the first icon, the pencil, it also includes undo options
  • New under the Link icon is the ability to create a bookmark on the page.
  • Photos can now be added from one's Google photos as well as those previously used on Blogger
  • A wide range of input language options are under the globe icon, along with left to right and right to left input options

editing toolbar
Editing toolbar

The Save button is now located under the Preview drop down.

Editing Pictures

Blogger is not a picture editing tool so it is a good idea to have edited your pictures before they are added to your blog. Once a picture is inserted, highlight the picture to reveal the picture toolbar which provides easy alignment, resize options, caption, title and alt text options.

Picture toolbar options

Adding labels

The post settings are unchanged on the left of the edit screen. 

Customising the Theme

Do you prefer to choose the font and colours along with many other elements to personalise your blog? Choose Theme from the sidebar, then Customise to see the wide range of options available.

This blog is based on the Simple theme, most customisation options are still available in a sidebar menu. This screenshot from another blog shows the customise button from the Notable theme. This will take the blog owner to the Theme Designer options.


Notice also the New Post button which has been moved back to the top of the page following user feedback given to Google.


Scroll under each option to reveal a wealth of ways in which you can personalise your Blogger theme.
If you make changes to any element of the theme, the disk icon to save those changes is located in the bottom right hand corner of the screen.

If  you have any questions about the new Blogger interface, add them in the comments where I will respond to queries. Do look and try the new interface before the permanent changeover occurs.

Other input options

Now we need a decent iOS app for Blogger - how about it Google? The Blogger app for Android has basic options and was updated in June 2020. The best iOS app I have used is BlogTouch. 

If you write your posts in Word or some other text based program, paste as plain text or be sure to  remove the formatting for quicker loading pages. Use Blogger's headings and subheadings for a consistent look across all posts.

This post first appeared on https://carmelgalvin.info

Friday, 29 November 2019

10 years on

10 years on

On Monday 30 November 2009 I wrote my first blog post about the generosity of librarians who curate and share a wide range of resources. Ten years later and now retired, I still find much to read and share from those in the librarian sector. My posts are irregular but the beauty of blogging is in the longer form of content, more than a tweet, more than a picture on Instagram, less fleeting than Facebook. My original title Library Currants reflected my idea of providing small bites of hopefully useful information. Over time this blog has morphed more into a random collection of articles that I think might be of interest to others usually with a touch of “did you know about this” or “did you know how to do this.”

The world of blogging has connected me with a wide range of people throughout the years many of whom I continue to follow and learn from their wisdom. I’ve gained a wealth of knowledge from Richard Byrne’s friendly advice at Free Tech for Teachers and Tim Sherratt’s explorations of the possibilities of digital collections. Dozens of other bloggers continue to  inspire. I use Feedly to gather the blogs and sites I want to read.

My family history interests have opened up a world of genealogy bloggers who share their tips and tricks. Just this week a referral from Dick Eastman’s Online newsletter sent me to a previously ‘unknown by me’ tool on Randy Major’s site. His most recent post Have you tried AncestorSearch on Google Search for searching for ancestors (or living people) lately? makes clever use of Google search advanced features. The tool AncestorSearch compiles a range of possibilities for the names that are input. Head over there and do try it out.

I used AncestorSearch to look for great grandparents Edward Smyth and Margaret Byrne. Yes, I already have quite a lot of information about them but was interested to see if anything else would be revealed. When the full Google search is run, the first result is a blog post I wrote on my family history blog over at Earlier Years.

No surprises there, but further down the results page is a Flickr reference to a stained glass window in their memory. While I have a similar photo taken with my phone, this one is so much better but I would never have found it by searching on Flickr.
Smyth memorial window - Tarlee Catholic church
Detail from Smyth memorial window - Tarlee Catholic Church (my version)
In the Flickr album photographer aquilareen has added all the photos of the windows in the Tarlee Catholic Church and some details of the families that can be found in Trove. In the comments section of these photos I have now added the links to my blog posts about some of those families the windows commemorate. So from a blog referral to a tool to a picture and back to my family history blog.

10 years on, still learning, still blogging. What joys has blogging brought to your life?


Wednesday, 21 August 2019

An essential tool for family history bloggers

Is your blog print friendly?

If you have a Blogger blog consider installing a Print Friendly button for those who wish to save your posts or indeed for you to save your own posts to PDF.

Not all browsers have a reading mode to remove the annoying distractions found on many blogs, and not all readers will have a PrintFriendly extension installed on their browser. Many bloggers use Adsense to generate some income. The PrintFriendly button allows your reader to save a post without that extraneous content. It also removes the sidebar and any gadgets contained therein.
  1. In the Layout mode from your Blogger dashboard choose the area where you want to insert the Print Friendly button. On this blog, I have chosen to insert it at the bottom of the post in the Footer area.
  2. Add gadget - choose the HTML/Javascript gadget

  3. Head over to https://www.printfriendly.com/button and choose the style of button you want to add.
  4. Select the features you require, decide whether to allow click to delete sections or not, then copy the code generated into the blogger gadget and save.
  5. Save the Layout and choose a post from your blog to view. It will now display your chosen button.
Here's how the heading of a PrintFriendly page appears from one of my recent posts. Notice the choice of text size and image size. Image size can be set to 0 to remove all images.

Once the PrintFriendly page has been generated, hover over individual paragraphs or headings to reveal the bin to delete any sections not needed in the print or PDF version. This only works if you made that selection before copying the code. I have it disabled on this blog.
Do experiment and test what works best for you.

To view an alternate PrintFriendly button head over to my family history blog, Earlier Years or view the PrintFriendly button inserted in the sidebar in Just at Tarlee.

Limitations

  • If the button is installed in the footer area of the page, it displays at the bottom of all the posts you have chosen to have display. To determine how many posts show on your main page go to Settings | Posts and Comments | Show at most and select the desired number.  It will always display when an individual post link is selected.
  • If the button is installed in the Sidebar it is always visible, but will print all the posts you have chosen to display.

For your own use, consider installing the free PrintFriendly extension for Chrome and simply click on it when you visit one of those annoying sites with dozens of advertisements.

This post first appeared on https://carmelgalvin.info

Sunday, 30 June 2019

Email subscriptions to blogs

Checking out Feedburner


A reent notification from Google had me scurrying to Feedburner to check out my email subscription settings on my blogs. The Blogger platform uses Feedburner to manage email subscriptions.
To check out your email subscriptions head to feedburner.google.com

  1. Click on My Feeds at the top of the page 
  2. Choose from your blog list to view the dashboard for that feed

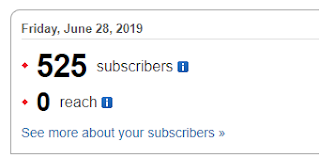
From here you can see when and from which country your email subscribers accessed your blog.

From the Feed Stats Dashboard I chose See more about your subscribers. This indicates 0 reach on June 28 as there was no blogpost on that day. One can select the last 7 days, or month or all time to view the email reach.

At the bottom of the next screen choose Feedburner Email Subscriptions then Manage your Email Subscriber List

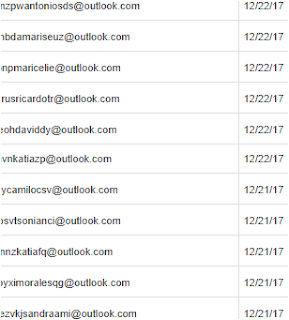
It was here that I found dozens of dodgy email addresses many subscribed on the same day or within 2 or 3 days. It is a tedious process to delete them one by one.

This sample was from 2017 and there were more instances of these type of subscriptions recently. 

You can also see the incomplete subscriptions, so if family members were confused by the process of subscribing by email, there is an opportunity to explain to them that the email they received from Feedburner was a legitimate step to follow in signing up to your blog.

Do you know who is subscribing by email to your blog?

This post first appeared on https://carmelgalvin.info

Monday, 1 April 2019

Genealogy blogs A-Z challenge


Each year the A to Z challenge provides an opportunity for bloggers to choose a theme and post using the letters of the alphabet during April. There are over 550 bloggers participating. Below is a list of those who have indicated that their theme is Genealogy focussed.  

This is my third year of participating, once on this blog and now for a second time on my family history blog. My focus this year is on digitising my mother's recipe collection to preserve her handwriting and pass on some of her favourite recipes.


Anne's Family Historyhttps://ayfamilyhistory.com
The Old Trunk in the Attichttp://oldtrunkintheattic.blogspot.com/
Cheryl Hunnisetthttp://cherylhunnisett.com/
Finding Elizahttp://findingeliza.com/
Anglers Restanglersrest.net
TravelGeneehttps://travelgenee.com/
Nanniemarcy Family History Storieshttps://nanniemarcy.blogspot.com
Genealogy Blog: A blog about genealogy in Denmarkhttps://www.kottalgenealogy.com/blog/
Family Wise Limitedhttps://family-wise.co.uk/blog/
The Genealogy Show https://www.thegenealogyshow.uk/blog/
iFamilyHistoryiFamilyHistory.blogspot.ca
Virginia Allainhttp://martinmcghee.wordpress.com
Pressing M Waypressingmyway.wordpress.com
Jollett Etchttps://jollettetc.blogspot.com
A Home for the Family Treehttps://ahomeforthefamilytree.com
Earlier yearshttps://earlieryears.blogspot.com/
The Past Whispershttp://www.thepastwhispers.net/
Family history across the seashttps://cassmob.wordpress.com
HeenanFootstepshttps://heenan.one-name.net
digginguprootshttp://digginguproots.edublogs.org
FamilyHistory4u https://www.sharnsgenealogyhints.blogspot.com
The Keough Cornerhttps://keoughcorner.blogspot.com/


This post first appeared on https://carmelgalvin.info

Friday, 8 February 2019

Using emojis in blog posts

Could emojis be useful in blog posts?

Following a tip from Jake Miller about using emoji bullets in Google Docs and Slides, I investigated a couple of ideas for using them in Blogger.

📌 subsitute for plain bullet points
📌 to add some colour

Several ways to access emojis

 1️⃣   From the blogger menu bar, Insert special characters reveals a wide range of emoji.
Insert special characters from Blogger menu bar


2️⃣   In Windows 10 Use the WIN logo key and period to reveal this pop-up from which to select emojis. It is displaying the 1 and 2 I've just used.

Pop-up displayed - WIN key and period

3️⃣   Use the Windows 10 touch keyboard. To enable the touch keyboard on non-touch screens, right click on the task bar and ensure touch keyboard has a tick next to it. The icon for the keyboard now shows on the task bar. Click on the task bar icon to use the keyboard on screen with either mouse or touchpad.

win10 touch keyboard
Touch keyboard

4️⃣   Can't find the emoji you want? Try EmojiCopy

Keep in mind that emoji may display differently to the one you inserted depending on the device your reader is using. These numbers I have used 1- 4 appeared blue when inserted, but display as white when published here on Windows 10, but retain their colour on the ipad. Have fun investigating.


This post first appeared on https://carmelgalvin.info

Annoying Anonymous

Is that really you?

My blogs are set up so that any comments made are sent to me for approval before publication. Most days I receive a comment from that unidentifed person or robot Anonymous. 

Anonymous, your comments are never going to be published even if they are sometimes complimentary. Comments are only published when the commenter's details are provided so please stop wasting your time and my time.


This post first appeared on https://carmelgalvin.info

Sunday, 21 October 2018

Fresh start rename


Time passes and interests change.

When I started blogging here in 2009 I was working as a teacher librarian in a large school library so my focus was on library related matters and assisting students and teachers in their learning endeavours. Library Currants - Small, not always current, but fruity observations judiciously mixed with learning was an appropriate focus for the time.

In retirement my focus has shifted to assisting seniors adapt to technology along with more personal interests in family history and sharing new experiences. So Library Currants has morphed into Carmel's Corner, with a new address to accompany the name change. I was spurred on to this change by a post from Dick Eastman: Get a facelift: why you want your own domain name

A visit to NameCheap, a payment of less than $10, a few tweaks following their excellent instructions for using the domain name with Blogger  and within about 30 minutes the change was made.

Welcome to my refreshed, renamed corner on the web. 


This post first appeared on https://carmelgalvin.info

Friday, 12 October 2018

Is it mobile friendly?

Have you checked your blog?

In response to Jill Ball's post A  Blog Reader’s Plea here are two, less than 30 second videos, demonstrating how to check whether your blog is mobile friendly.

These videos were made with Quik, a free, very easy to use video editor available for ipad, iphone and Android. Add videos, photos or screenshots to make a video. Choose from the music which comes with the app. Titles and captions can be added where needed. Save and share to a variety of platforms.

Blogger


Wordpress


Have you tried an easy video editor to share family photos?


This post first appeared on https://librarycurrants.blogspot.com

Sunday, 30 September 2018

Untangle those Blogger knots

Untangle those Blogger Knots
Knots - Mary Cairncross Park, Maleny, QLD.
The simplicity of the Blogger platform enables many to get started publishing their family history stories. As time goes on familiarity with the platform may not progress beyond the basics of choosing a theme, adding posts and labels.

10 tips to help along the way

Top toolbar

1. If you use Blogger to write posts, use the toolbar.  The fonts it suggests will look best for the theme you have chosen. Do your readers a favour and save fancy fonts for titles and emphasis.

2. If you paste text in from another application, either right click to Paste as plain text or highlight the pasted text and use the Tâ‚“ symbol to remove formatting. This will solve many a blogger's woes in getting a consistent layout and avoid unnecessary spacing between blocks of text. Headings and subheadings can then be added using the drop down options under Normal.

3. Left justify text. The majority of works published in English use left justified or fully justified text.
Centring text is best used only for emphasis in very short passages.

4. If using a quote, choose the quote symbol located to the left of the Tâ‚“ button.
The quote will be indented and set apart from the rest of the text. Sometimes I like to italicise a quote.
5. Lists and bullet points help the reader with long passages of text. A numbered list is particularly useful when providing a list of children from a marriage.

6. Investigate the Insert Special Characters Tool 😃on the top toolbar. Here you will find symbols,  ⇉ @ ©, superscript and subscript, numbers ½, ¾‏, and emojis. There are several choices within each drop down menu.

7. Picture placement appears to puzzle many. 
  • The options bar under the inserted pictures provide prompts for size and position. 
  • The Properties option prompts for title of the picture and Alt text for screen readers. 
  • If any further size adjustments are needed head to the HTML and find the size of the image inside the img tags. For the image below it read :
border="0" data-original-height="32" data-original-width="561" height="36"
I changed the border width, a very simple edit by inserting 4 instead of the 0. This provides a little extra space between your picture and text. So too can width and height be altered but be careful to keep the numbers proportional to avoid distorted pictures.

Picture toolbar
Picture toolbar

8. Preview, preview, preview.
Does it look clear, no extra spaces, not too long? Use the ABC button on the toolbar to check spelling.

9.  Add labels and a Search Description in the sidebar. This helps search engines find your blog and provides the snippet for Facebook that will be seen under your link.
:
10. Publish and post to social media using the link to your post title to take readers to the exact post. Enjoy and respond to comments by readers.


Friday, 2 March 2018

Interactive charts for family history bloggers

Producing a visual interactive chart for your Blogger blog

While most genealogy programs will produce a csv or spreadsheet chart of some sort, they are usually not friendly for Blogger blogs. For those not using TNG site building software or Webtrees there are some other options. Two of the simplest options are outlined below.

An organisational chart using Google Slides


  1. On a blank slide choose Insert - Diagram
  2. Select from the range of organisational styles available
  3. Choose how many levels to display, the options are 3,4 or 5. On my slide I chose three. 
  4. Choose a colour then add the chart to the blank slide. 
  5. Modify the text and add the links to your blog posts. The text in the slide above is Roboto font, size 18, white, bold and each name is linked to an individual post on my Earlier Years blog.
  6. Select the whole chart and drag to enlarge to fit the widescreen slide
  7. Under the file menu choose publish to the web. Any changes you subsequently make, will be automatically updated.
  8. Choose embed - this one is the small size, copy and paste the embed code into the HTML editor of your blog.
*Alternate strategy when a diagram does not meet your needs
Start with a blank slide, insert a basic shape, fill with colour, double click in it to add generic text and format the font and size. Now duplicate as many of that shape as needed, arrange on slide then use elbow joiners to link the shapes. Add the names and links to the shapes. Proceed as detailed above.
Make a copy of your slide in Google Drive and rename to Template - blog family tree so that you can use the same slide for a different family without affecting your embedded publication.

Using a Google spreadsheet

A pedigree view can be simulated in a few different methods in spreadsheets. This is a simple one.  Here's a link to a diagrammatic spreadsheet of  Hannah's ancestors created in Google sheets.

  • I've used three columns and enough rows to allow for the descendancy to show. 
  • The cells have added colour and links added to individual posts.
  • Under the file menu choose publish to the web. Any changes you subsequently make, will be automatically updated.
  • Choose embed - copy and paste the embed code into the HTML editor of your blog.
  • The same spreadsheet is shown below published to the web and embedded here. 
  • The embed code does not have any details for height and width so only shows this small scrollable box.


This one has some added HTML in the code to improve the size of the display.


Warning: if you copy from here do paste into a plain text editor such as notepad, check and compare it before adding to your embed code.
Paste in the embed HTML then add in the code in red after the word  iframe and before src=

frameborder="0" headers="false" height="300" mozallowfullscreen="true" 

Then after widget=true copy and insert webkitallowfullscreen="true" width="640"

Once again, save a copy of your spreadsheet renaming it as a template so that it can be reused for the next family.

If you are more adventurous visit Tony Proctor's blog Parallax View to investigate how to embed an SVG family tree.


 This post was written by Carmel Galvin and first appeared on https://librarycurrants.blogspot.com

Thursday, 8 June 2017

Picture this

Noosa river at sunset
A view of Noosa river at sunset

Each day in April I posted a picture along with my short recollection for the day over on Earlier Years. Many of those pictures I had sourced throughout the year from my own files and some from Pixabay. I created the daily graphics in Canva, Pixlr, Over, WordSwag or Haiku Deck. Some of these are available as apps on both iOS and Android, some have a web interface and all require minimal skill to output an acceptable graphic.

Now as the cooler weather of winter bids me spend more time indoors, I’ve sorted many digital snaps taken on my daily walks around the local area along with some photos from trips we’ve taken. I’ve  added some generic text that may focus my thoughts on a particular area of family history.

Dead palm frond
Dead palm frond
So far I’ve uploaded 35 of these pictures to Flickr in this album Images for family history blogposts. They are in a variety of sizes and shapes and will load quickly on any page. Some of these may prove useful for my readers, so I’ve made them public and set the date on all of these as June 2017, not the original date these photos were taken. If you have suggestions for further graphics along these lines, please add your ideas in a comment.

For those who will be attending Congress 2018 in Sydney next March be sure to get along to Jill’s session on Beaut Blogs: Ideas for Tarting up your Geneablogs. She will have lots more, ideas galore, for you to explore.


Tuesday, 21 February 2017

Three simple code tweaks for bloggers

Here’s some easy code for your blog. I like to add references to the end of my family history posts rather than have them intrude in the story. Blogger and the free Wordpress sites have limited tools so a little code is useful for improving the view on the blog.

Three easy ones to use are:
  • blockquote
  • superscript or subscript numbering
  • horizontal line
Here’s how they look along with the code to make it happen.

BlockQuote

This is an example where the text is indented and continues to remain so on the following lines. It is ideal for highlighting such things as text from newspaper notices. I sometimes use it for extensive obituaries in preference to italics. Use the HTML page of your blog and insert the code shown in the picture below. In some blog themes blockquotes may appear with a different background colour or font compared to the rest of your post.
blockquote (1)

Numbering

Rather than interrupt the flow of text insert numbered references, footnotes below the finished post. Decide on either superscript or subscript and use the code shown below to surround the number. I suggest you add the numbers as you type and add the appropriate references below your post. When the post is finished go to the HTML page and find each number within the text. Add the chosen code either side of the number as show below. Superscript1 subscript2
subscript

Horizontal Line


This one is super simple, but again finish the post first. On the HTML page place the cursor where you want the line to appear. Using the same bracket < to open the code, type hr then > to close. Here I’ve used a horizontal line code directly after the heading Horizontal Line, then I’ve added another one at the end of this paragraph. These simple tweaks can enhance your blog and break up long sections of text. See the use made of this code on my family history blogpost The family rally around.

This post first appeared at http://librarycurrants.blogspot.com/2017/02/three-simple-code-tweaks-for-bloggers.html

Saturday, 13 February 2016

Post in haste, repent with no pleasure

Catch the errorsbefore postingWherever and whenever I write, I try to correct for errors before pressing send, enter or post. Sometimes an email slips away with mistakes, a blog post has glaring errors or a message on Facebook fails to make sense. Enter my newest friend Grammarly.

We’ve all seen those mistakes where apostrophes are used when a plural s is sufficient. The lack of commas in writing can lead to some significant misunderstandings. Grammarly checks and highlights these omissions.

imageInstall the Chrome extension and sign in to a free account. Click on the small green G in the toolbar. This will activate the extension which will now be displayed at the bottom of the screen and Grammarly will begins its work. A new window opens with suggested corrections displayed.

No more indecision about what’s correct. Those its and it’s should no longer cause angst. The free version of Grammarly checks the spelling in context, grammar, and punctuation. It also analyzes sentence structure and style. Other advanced features are available through the paid subscription service. I’ve found the free version works for me.

The suggestions provided can be accepted or ignored. The sample below shows where I had omitted an apostrophe. To correct, click on the green highlighted word.


imageGrammarly found four errors in this post before I published. Why not give it a try? It may save an embarrassing moment.


Tuesday, 29 December 2015

Using Open Live Writer

If you have ever lost a blog post in the draft stage Open Live Writer may solve that problem for you. A quick look at my Blogger account revealed I had 3 posts in Draft. The problem with the Draft format in Blogger is that it is easy to make a mistake when editing, deleting or moving text around. If an accidental highlight leads to a deletion or an unwanted alteration is made, one must be very quick to Undo before Blogger’s automatic Save cuts in and all that text disappears.
I use Blogsy, an excellent app for posting from the ipad but my preference is to use the laptop whenever possible. Sometimes I have written posts in Evernote then copied into Blogger. This method means that all formatting needs to be done in Blogger. The beauty of Open Live Writer is all the formatting can be done and previewed before posting.


Why would you use Open Live Writer?

  • draft posts can be viewed within the application
  • draft posts are saved to one’s own computer
  • finished posts can be sent straight to your blog
  • the interface is similar to most word processing programs
  • no unnecessary behind the scenes code that slows down the display of your posts
  • the menu bar has more sophisticated tools than that in Blogger
  • image/picture manipulation has its own toolbar with crop, format, exact dimensions and more
  • unlike word processors, OLW is designed for blog posting, once set up the process is easy
  • it is free and open source

Getting started

Download from Open Live Writer and follow the installation instructions.

ol2


It is then necessary to log in to your blog account. I was already logged into my Google account and received an error message in the browser but when I returned to the OLW installation screen the next step had appeared.

ol4


By downloading the theme your blog uses it ensures that you view the post as it will appear online.

ol3


Now you are ready to write and post. Remember to Save regularly as there do not appear to be preferences that can be set to automatic save. Your local saved drafts can be found under File > Open Local Drafts.
To add another service or another blog choose menu option Blog Account > Blog options >Add
ol6


Images in this post were dragged on to the editing window. The width of each picture is set to 390px to give a uniform look to the post. This enables much better image control than the small, medium, large options provided in the Blogger interface. When editing and previewing are finished, one can choose to Publish direct or Post to Drafts. Warning: the spell check tool in OLW is not yet working! This post was written, previewed in OLW then posted directly from OLW to Library Currants. 

Thanks to Shelley at Twigs of Yore for informing me of this tool.

Tuesday, 30 December 2014

Beat the Blogger blues

Getting the most out of Blogger


A couple of recent posts on blogs I follow have prompted me to remind myself and others about making the best use of Blogger's inbuilt tools. I've been benefiting from the expertise of those sharing their knowledge on Worldwide Genealogy  where I have noticed some Wordpress contributors struggling with the unfamiliar to them platform.  I hope some of these hints may be useful.

Another blog A Family Tapestry post Scraping: the bottom of the barrel reminded me of the need to check that each post had an originating link embedded at the end of the post. This can be enabled through the dashboard in Settings. I usually edit the embedded address to the exact post address which can be located in the sidebar under the Links heading. The link can be customised or left on automatic.

When I copy the exact link address from the sidebar in the editing mode and paste it on the bottom of the post it appears thus http://librarycurrants.blogspot.com/2014/12/beat-blogger-blues.html  complete with blue background. One of the handiest tools in the Blogger editing bar is the Tx symbol. Highlight any text and use this to remove formatting that has been carried over from copy and paste actions.

The address now appears in the normal font and colour dictated by the template used and I can further refine it by highlighting and selecting Link from the menu bar as well as using the TT tool to reduce the size of the text  http://librarycurrants.blogspot.com/2014/12/beat-blogger-blues.html .

If you write your posts in MS Word or any other program, always highlight all the text then use the Tsymbol to rid it of unwanted formatting. This is particularly useful for family historians copying text from old newspapers and other sources.

Next I add a Search Description in the Post settings to give my post a chance of being found and read!

Today I became aware of a feature I had not previously used, the ability to predate a post. Whilst I have previously used the Schedule function for posts to be published in the future, I had never considered its usefulness for resurrecting earlier web content published elsewhere. This post by +Chris Betcher made me realise the value of being able to manipulate the dates to earlier years in Blogger. He has brought previously defunct webpages covering 20 years of his family history into a new blog using the Set date and time function under the Schedule menu.

Before I publish a post, I spell check! This tool  ABC/ is located on the far right hand side of the Blogger toolbar. It can be used on posts and all static content pages.

Finally, if you have copyright details on your blog, it is now time to update for 2015. Now back to checking my own blogs for errors!


This post first appeared on http://librarycurrants.blogspot.com/2014/12/beat-blogger-blues.html

Enjoyed this post? Want to see more?